Raspberry Pi
Installation & Configuration

- Single-board computers
- Low-cost
- High-performance
- Raspberry Pi OS
- Previously called Raspbian
- Linux distribution based on Debian
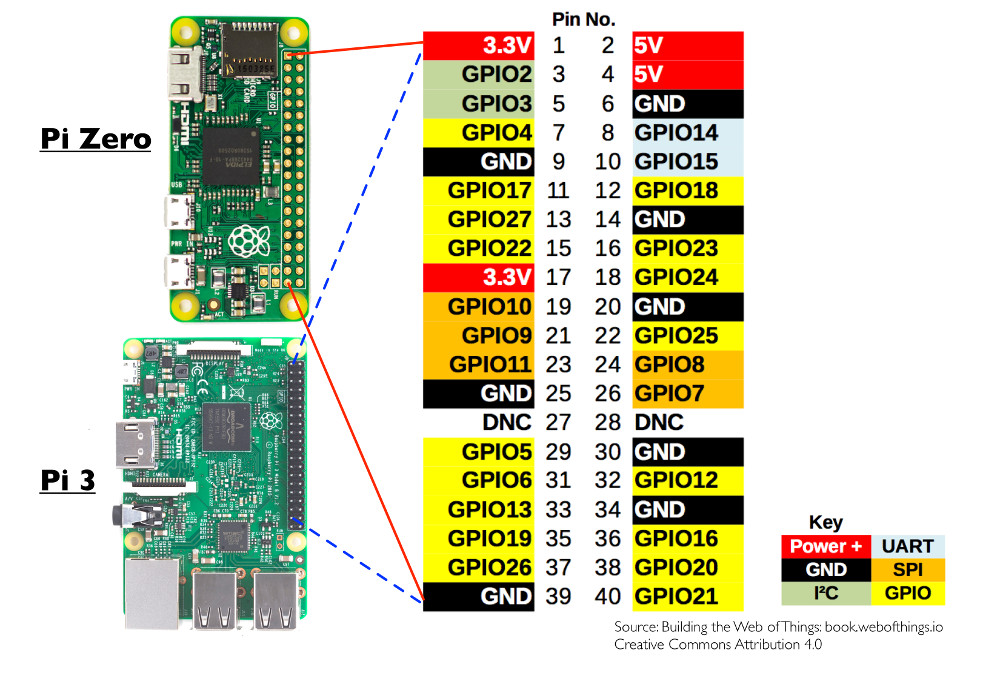
 Pinout

 Installation
Download latest Raspbian image from:https://www.raspberrypi.org/downloads/
Insert a SD-Card (>4GB) in a Linux PC
Attention: the whole card will be erased.
# SD-Card device may need to be adjusted:
DEV=mmcblk0

# Uncompress the image
unzip *-raspbian-*.zip
# Copy Raspbian filesystem image to SD-Card
sudo umount /dev/$DEV
sudo dd bs=4M if=*-raspbian-*.img of=/dev/$DEV conv=fsync
Filesystem is now ready, insert it in Raspberry Pi, power it, an log as pi/raspberry.
To configure local settings and ensure LOCALE is correctly set:
> Preferences > Raspberry Pi Configuration
# For command line only image:
sudo raspi-config

# sudo dpkg-reconfigure locales
# sudo vim.tiny /etc/default/locale
Reboot the system.
Next steps can be achieved remotely
ssh 192.168.1.2
To rename default Raspberry Pi user (pi):
sudo su

# Set user name:
USER=user

vi /etc/passwd
/etc/passwd
pi:x:1000:1000:,,,:/home/rpi:/bin/bash
$USER:x:1000:1000:,,,:/home/$USER:/bin/bash
vi /etc/group
/etc/group
pi:x:1000:
users:x:1000:
# also replace all ':pi' with ':$USER'

mv /home/pi /home/$USER

echo "$USER ALL=(ALL) NOPASSWD: ALL" > /etc/sudoers.d/$USER
chown root:root /etc/sudoers.d/$USER
chmod 0440 /etc/sudoers.d/$USER

vi /etc/sudoers

-pi ALL=(ALL) ...

# To configure default startup (console or X11 GUI)

# For graphical interface
# systemctl set-default graphical.target
# For text console:
# systemctl set-default multi-user.target

vi /etc/lightdm/lightdm.conf
/etc/lightdm/lightdm.conf
autologin-user=pi
autologin-user=$USER
vi /etc/systemd/system/autologin\@.service
/etc/systemd/system/autologin@.service
ExecStart=-/sbin/agetty --autologin pi --noclear %I $TERM
ExecStart=-/sbin/agetty --autologin $USER --noclear %I $TERM
# Set a password for new account:
passwd $USER
# Change password

# Reboot the system:
reboot
Linux header are required to build kernel modules
# sudo apt-get install linux-headers
sudo apt-get install raspberrypi-kernel-headers
Note: rpi-update can upgrade kernel, so package may not available
# Update kernel and firmware
sudo rpi-update

# Get Kernel sources
sudo wget https://raw.githubusercontent.com/notro/rpi-source/master/rpi-source -O /usr/bin/rpi-source && sudo chmod +x /usr/bin/rpi-source && /usr/bin/rpi-source -q --tag-update
rpi-source --skip-gcc

# Build a module
make -C /lib/modules/$(uname -r)/build M=$(pwd) modules
sudo insmod my-module.ko
To load module automatically:
sudo depmod
sudo make -C /lib/modules/$(uname -r)/build M=$(pwd) modules_install
sudo modprobe my-module

# To load module at startup
echo "my-module" | sudo tee -a /etc/modules
 Update the system
Regularly, make sure the system is up-to-date
sudo apt-get update
sudo apt-get upgrade

# also remove useless stuff
sudo apt-get remove bluej greenfoot
 Networking
Static routes in raspbian should be set via dhcpc
echo "ip route add 192.168.8.0/24 via 192.168.0.101" | sudo tee -a /lib/dhcpcd/dhcpcd-hooks/40-route
/etc/wpa_supplicant/wpa_supplicant.conf
network={
        ssid="My-SSID"
        psk="MySecretPassphrase"
}
To bridge 2 network interfaces:
sudo apt-get install bridge-utils
sudo brctl addbr br0
sudo brctl addif br0 eth0 eth1
 Wlan to Ethernet repeater
Raspberry Pi could be used to connect Ethernet devices to WLAN network, however:
- WDS repeater is required to add WLAN STA interface to a bridge, but Raspberry Pi 3 / Zero-W WLAN does not support it.
- Multiple subnets require static routes to be added on all devices
- NAT router will isolate devices behind ethernet router (not easily seen from WLAN)
Solution described here relies on:
- Proxy ARP creates a layer 3 bridge between WLAN STA and ethernet LAN
- PARP Routed automatise Proxy ARP route generation
- dhcp-helper to relay DHCP requests from Ethernet devices to WLAN DHCP server
To enable ProxyARP:
sudo apt install parprouted dhcp-helper avahi-daemon
echo 1 > /proc/sys/net/ipv4/conf/all/proxy_arp
echo 1 > /proc/sys/net/ipv4/ip_forward
ip ro add 192.168.0.222/32 dev eth0
ip link set wlan0 promisc on
DHCP request (Layer 2 broadcast) are not crossing ProxyARP, so a DHCP relay is required.
# Install dhcp-helper DHCP relay
sudo apt-get install parprouted dhcp-helper avahi-daemon
DHCP relay should listen to wlan0 interface:
sudo vim.tiny /etc/default/dhcp-helper
DHCPHELPER_OPTS="-b eth0"
DHCPHELPER_OPTS="-b wlan0"
more /etc/default/isc-dhcp-server
more /etc/dhcp/dhcpd.conf
2021-12-07
