ESP32/8266 Software Development
ESP32 HW modules
ESP32-C3 super mini
 |
Low-power application board equipped with ESP32-C3 SoC
Feature:
- RISC-V 32-bit single-core processor, up to 160MHz
- 2.4GHz Wi-Fi (802.11 b/g/n) and Bluetooth® 5 (LE)
- 400KB of SRAM and 384KB ROM, and 4MB of onboard Flash memory
- Onboard ceramic antenna
- Integrated with USB serial port (full-speed)
- 3 × SPI, 1 × I2C, 2 × UART, 1 × I2S, 2 × ADC, etc.
|
ESP32-C6 Core Board
 |
General-purpose modules supporting Wi-Fi 6 in 2.4 GHz band, Bluetooth 5, and IEEE 802.15.4 (Zigbee 3.0 and Thread 1.3).
Feature:
- Built around the ESP32-C6FH4 chip, with 8MB flash.
- On-board PCB antenna.
- 5V to 3.3V LDO Power regulator.
- USB-to-UART Bridge (transfer rates up to 3 Mbps.)
- ESP32-C6 USB Type-C Port (USB 2.0 full speed, used for power supply, flashing, and serial communication / JTAG debugging).
Reference | html
|
ESP8266 HW modules
ESP8266 Wemos D1 mini
 |
D1 Mini module includes ESP12E/F with a CH340 chipset for UART communication.
Features:
- USB socket for power and programming/debugging.
- Auto-reset system guaranteeing automatic upload.
- It is natively supported by the Espressif SDK.
Characteristics
- Wemos schematics | html
- Wemos dimensions | jpg
|
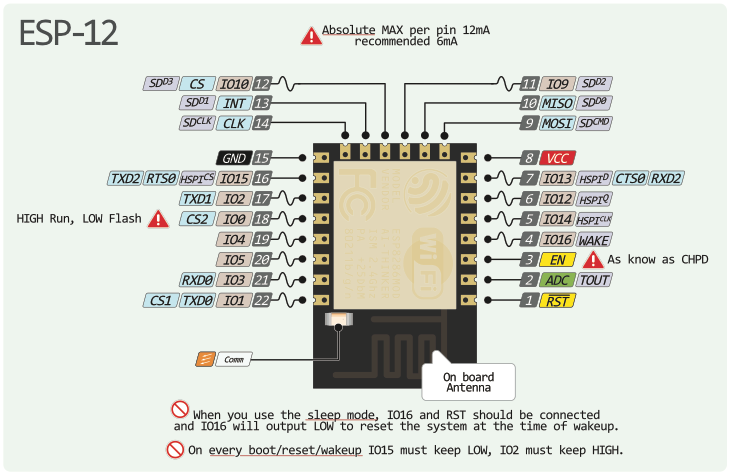
ESP-12F module
 |
ESP8266 serial bootloader can be used to program its Flash memory. ESP-12F module is assumed, but any ESP-12/12E/12S could be used as well, for other modules, pinout may change.
UART/USB connections are as follow:
- Power: VCC (8) to 3.3V, and GND (15)
- UART: RXD (15) to dongle TXD, TXD (16) to dongle RXD
- Enable: CH_PD/EN (3) to 3.3V
- Boot Mode: GPIO15 (10) to GND, GPIO0 (12) float (normal / flash boot) or GND (UART programming)
|
Pinout & GPIOs
ESP-12F pinout
Gpios
| GPIO | Name | Fct0 | Fct1 | Fct2 | Fct3 | Fct4 | Reset | Comment |
|---|
| 0 | gpio0 | gpio-0 | spi-cs2 | | | clk-out | In/PU | |
| 1 | u0txd | uart0-txd | spi-cs1 | | gpio-1 | clk-rtc | In/PU | |
| 2 | gpio2 | gpio-2 | i2so-ws | uart1-txd | | uart0-rxd | In/PU | |
| 3 | u0rxd | uart0-rxd | i2so-data | | gpio-3 | clk-xtal | In/PU | |
| 4 | gpio4 | gpio-4 | clk-xtal | | | | In/PU | |
| 5 | gpio5 | gpio-5 | clk-rtc | | | | In/PU | |
| 6 | sd-clk | sd-clk | spi-clk | | gpio-6 | uart1-cts | In/PU | |
| 7 | sd-data0 | sd-data0 | spi-miso | | gpio-7 | uart1-txd | In/PU | |
| 8 | sd-data1 | sd-data1 | spi-mosi | | gpio-8 | uart1-rxd | In/PU | |
| 9 | sd-data2 | sd-data2 | spi-hd | | gpio-9 | hspi-hd | In/PU | |
| 10 | sd-data3 | sd-data3 | spi-wp | | gpio-10 | hspi-wp | In/PU | |
| 11 | sd-cmd | sd-cmd | spi-cs0 | | gpio-11 | uart1-rts | In/PU | |
| 12 | mtdi | jtag-tdi | i2si-data | hspi-miso | gpio-12 | uart0-dtr | In/PU | |
| 13 | mtck | jtag-tck | i2si-bck | hspi-mosi | gpio-13 | uart0-cts | In/PU | |
| 14 | mtms | jtag-tms | i2si-ws | hspi-clk | gpio-14 | uart0-dsr | In/PU | |
| 15 | mtdo | jtag-tdo | i2so-bck | hspi-cs | gpio-15 | uart0-rts | In/PU | |
| 16 | xpd-dcdc | xpd-dcdc | rtc-gpio0 | ext-wakeup | deepsleep | bt-xtal-en | Out | |
AT Firmware
AT Commands
By default, ESP12x comes with AT command FW. Module can be used by external MCU via UART.
minicom -D /dev/ttyS0 -8 -b 115200
Ai-Thinker Technology Co. Ltd.

ready
AT+GMR<Ctrl-J>
AT version:1.1.0.0(May 11 2016 18:09:56)
SDK version:1.5.4(baaeaebb)
Ai-Thinker Technology Co. Ltd.
Jun 13 2016 11:29:20
OK
AT+CWMODE=1<Ctrl-J>

OK
AT+CWLAP<Ctrl-J>
+CWLAP:(2,"WIFI",-59,"00:10:20:30:40:50",1,-12,0)

OK
AT+CWJAP="WIFI","1234"<Ctrl-J>
WIFI CONNECTED
WIFI GOT IP

OK
AT+CIFSR<Ctrl-J>
+CIFSR:STAIP,"192.168.0.16"
+CIFSR:STAMAC,"60:01:02:03:04:05"

OK
AT+PING="192.168.0.254"<Ctrl-J>
+4

OK
Connection info is stored in NVRAM and will be kept for future reboots.
AT Firmware update
To update the ESP8266 firmware:
$esp-open-sdk/esptool/esptool.py --port /dev/ttyUSB0 --baud 115200 flash_id
esptool.py v1.2
Connecting...
Manufacturer: ef
Device: 4016

# Flash size is 32Mb (4MB), for other flash, adjust image as per README file

cd ESP8266_NONOS_SDK-*/bin
$esp-open-sdk/esptool/esptool.py --port /dev/ttyUSB0 --baud 115200 write_flash -fm dio -fs 32m -ff 40m 0x0 boot_v1.7.bin 0x01000 at/1024+1024/user1.2048.new.5.bin
esptool.py v1.2
Connecting...
Running Cesanta flasher stub...
Flash params set to 0x0240
Writing 4096 @ 0x0... 4096 (100 %)
Wrote 4096 bytes at 0x0 in 0.4 seconds (89.3 kbit/s)...
Writing 430080 @ 0x1000... 430080 (100 %)
Wrote 430080 bytes at 0x1000 in 37.3 seconds (92.3 kbit/s)...
Leaving...
Custom Firmware
Toolchain
ESP8266 firmware is build using GCC for Tensilica Xtensa LX106 and Espressif Non-OS SDK:
- esp-open-sdk toolchain | html
- Espressif ESP8266 Non-OS SDK | html
cd ~/local
git clone --recursive https://github.com/pfalcon/esp-open-sdk.git
cd esp-open-sdk
make STANDALONE=n

export PATH=$PATH:~/local/esp-open-sdk/xtensa-lx106-elf/bin
xtensa-lx106-elf-gcc --version
xtensa-lx106-elf-gcc (crosstool-NG crosstool-ng-1.22.0-60-g37b07f6) 4.8.5
Copyright (C) 2015 Free Software Foundation, Inc.
This is free software; see the source for copying conditions.  There is NO
warranty; not even for MERCHANTABILITY or FITNESS FOR A PARTICULAR PURPOSE.

# Install latest SDK
cd ~/local
git clone --recursive https://github.com/espressif/ESP8266_NONOS_SDK
# Get latest revision
# git pull

# esptool.py requires Python serial lib
sudo apt install python-pip
pip install pyserial
Blinky example
cd ~/local/esp-open-sdk/examples/blinky
# Add to Makefile:
# CFLAGS += -I~/local/ESP8266_NONOS_SDK/include -L~/local/ESP8266_NONOS_SDK/lib

make
xtensa-lx106-elf-gcc -I. -mlongcalls   -c -o blinky.o blinky.c
xtensa-lx106-elf-gcc -Teagle.app.v6.ld  blinky.o  -nostdlib -Wl,--start-group -lmain -lnet80211 -lwpa -llwip -lpp -lphy -lc -Wl,--end-group -lgcc -o blinky
esptool.py elf2image blinky
esptool.py v1.2
Flash example
make flash
esptool.py write_flash 0 blinky-0x00000.bin 0x10000 blinky-0x10000.bin
esptool.py v1.2
Connecting...
Auto-detected Flash size: 32m
Running Cesanta flasher stub...
Flash params set to 0x0040
Writing 36864 @ 0x0... 36864 (100 %)
Wrote 36864 bytes at 0x0 in 3.2 seconds (92.0 kbit/s)...
Writing 196608 @ 0x10000... 196608 (100 %)
Wrote 196608 bytes at 0x10000 in 17.1 seconds (92.2 kbit/s)...
Leaving...
C++ support
ESP toolchain includes g++ C++ compiler but libraries and script are targetting C only
Makefile
Here is a template for a C++ Makefile
Makefile
# Objects
OBJS := MyObj1.o MyObj2.o user_rf_cal_sector_set.o

# Inlcudes and libs
INCLUDES  := . $(SDK_DIR)/include $(SDK_DIR)/driver_lib/include
LIBRARIES := main net80211 wpa crypto lwip pp phy c gcc

# tools and flags
CC  = xtensa-lx106-elf-gcc
CXX = xtensa-lx106-elf-g++
CFLAGS = -mlongcalls -Wall -DICACHE_FLASH $(addprefix -I,$(INCLUDES))
CXXFLAGS = $(CFLAGS) -mtext-section-literals -fno-rtti -fno-exceptions
LDLIBS =  -Wl,--start-group $(addprefix -l,$(LIBRARIES)) -Wl,--end-group
LDFLAGS = -TWiSe.ld -Wl,-Map,WiSe.map -nostdlib -L$(SDK_DIR)/lib

# Default target: bin file to flash
Prog-0x00000.bin: Prog
  esptool.py elf2image $^

# Object file (ELF)
Prog: $(OBJS)

# RF calibration sector definition, copied from toolchain
user_rf_cal_sector_set.c:
  cp $(TOOLCHAIN_DIR)/$@ .
Static constructors
To use C++, static constructors must be executed at initialisation.
GCC create constructors init array, but it must be called by user program.
# Edit a copy of default Linker script (call ld with -TMyLdScript.ld)
cp $SDK_DIR/ld/eagle.app.v6.ld TMyLdScript.ld
vi TMyLdScript.ld
MyLdScript.ld
  .rodata : ALIGN(4)
  {
/* ... */
    . = ALIGN(4);
    __init_array_start = ABSOLUTE(.);
    KEEP (*(EXCLUDE_FILE (*crtend.o) .ctors))
    KEEP (*(SORT(.ctors.*)))
    KEEP (*(.ctors))
    __init_array_end = ABSOLUTE(.);
    KEEP (*crtbegin.o(.dtors))


/* ... */

/* To store class objects in external Flash (and save some RAM) */
  .irom0.text : ALIGN(4)
  {
    _irom0_text_start = ABSOLUTE(.);
    MyClass.o(.literal*, .text*)
    AnotherClass.o(.literal*, .text*)

    *libmbedtls.a:(.literal .text .literal.* .text.*)
Then, init array must be call in init code (we also define __cxa_pure_virtual here)
MyProg.c
// C++ global constructor init
extern void (*__init_array_start)(void);
extern void (*__init_array_end)(void);

static void init_array(void) {
  void (**p)(void);
  for (p = &__init_array_start; p != &__init_array_end; ++p)
    (*p)();
}

// Pure virtual trap
void __cxa_pure_virtual() { while (1); }

void ICACHE_FLASH_ATTR user_init() {
  init_array();
  rest_of_user_int()
}
Use external flash
Flash code section
Linker script can be adjusted to relocate code to external flash. Following script will move all *.irom.c files to external flash.
program.ld
   .irom0.text : ALIGN(4)
   {
     _irom0_text_start = ABSOLUTE(.);
+    *.irom.o(.literal*, .text*)

     *libat.a:(.literal.* .text.*)
External flash must not be used for code that may lock or execute in interrupt context.
Note: Code in external flash may run slower.
Flash rodata section
By default, ESP8266 linker script puts rodata section in RAM.
To save RAM space, some constants may be moved to flash:
program.c
const int table[] __attribute__ ((aligned (4), section (\".irom0.text\"))) = { ... };
Note: ESP8266 flash is not well suited for data: only 32-bits (aligned) read access are supported.
When used for other data (such as char or string), data may need to be relocated to RAM before being manipulated.
Preferably, a specific rodata section should be created in flash, but flash image generation script should also take this into account
program.c
const int table[] __attribute__ ((aligned (4), section (\".irom0.rodata\"))) = { ... };
program.ld
    _irom0_text_end = ABSOLUTE(.);
  } >irom0_0_seg :irom0_0_phdr

+  .irom0.rodata : ALIGN(4) { } >irom0_0_seg :irom0_0_phdr

  .text : ALIGN(4)
  {
esptool.py:936
        image.save(args.output + "0x00000.bin")
        data = e.load_section(".irom0.text")
+        data = e.load_section(".irom0.rodata")
        if irom_offs < 0:
            raise FatalError('Address of symbol _irom0_text_start in ELF is located before flash mapping address. Bad linker script?')
        if (irom_offs & 0xFFF) != 0:  # irom0 isn't flash sector aligned
Debugging
Direct access to tty port:
stty -F /dev/ttyUSB1 115200
echo -n ¨01 59 00 ff 00 0a ff 03 1b 0a¨ | xxd -p -r - /dev/ttyUSB1
echo -n ¨01 59 00 00 ff 44 08 ff 10 08 0a¨ | xxd -p -r - /dev/ttyUSB0
Tty renaming via udev:
sudo vim.tiny /etc/udev/rules.d/50-UsbSerial.rules
SUBSYSTEM=="tty", ATTRS{idProduct}=="7523", ATTRS{idVendor}=="1a86", ATTRS{bcdDevice}=="0254", SYMLINK+="ttyRs485"
SUBSYSTEM=="tty", ATTRS{idProduct}=="7523", ATTRS{idVendor}=="1a86", ATTRS{bcdDevice}=="0260", SYMLINK+="ttyEsp"
SUBSYSTEM=="tty", ATTRS{idProduct}=="6001", ATTRS{idVendor}=="0403", SYMLINK+="ttyStm"
Usage
STM32
cd ~/Documents/dev/stm32hal/stm32f030f4-led
make
../flash.sh
ssh pi@192.168.0.21 local/bin/stm-ctrl reset

ESP8266
cd ~/Documents/dev/esp8266/ToBe-WiSe-Sw
make remote
ssh -t pi@192.168.0.21 minicom -D /dev/ttyEsp -b 38400
ssh pi@192.168.0.21 local/bin/esp-ctrl reset

RS485
cd ~/Documents/dev/utils/rs485-client
make remote
ssh -t pi@192.168.0.21 local/bin/rs485-client
echo -n ¨01 59 00 00 ff 44 08 ff 10 08 04¨ | xxd -p -r - /dev/ttyRs485
RTOS firmware
Host preparation
From Espressif "Get Start Guide" | html
sudo apt install git gcc git wget make libncurses-dev flex bison gperf python python-pip3
# sudo apt install python2
# sudo apt install python-is-python3

python2.7 -m ensurepip
python -m pip install --user -r /opt/esp/ESP8266_RTOS_SDK/requirements.txt
python2.7 -m pip install pyserial click future cryptography pyparsing=2.3.1 pyelftools
# python2.7 -m pip install -Iv pyparsing==2.3.1
Toolchain & SDK
sudo mkdir /opt/esp
sudo chown `id -un`:`id -gn` /opt/esp
cd /opt/esp

wget https://dl.espressif.com/dl/xtensa-lx106-elf-gcc8_4_0-esp-2020r3-linux-amd64.tar.gz
rm xtensa-lx106-elf*.tar.gz

git clone https://github.com/espressif/ESP8266_RTOS_SDK.git
Build example
export IDF_PATH=/opt/esp/ESP8266_RTOS_SDK
#export PYTHON=python2.7
#export CONFIG_SDK_PYTHON="python2.7"
PATH=$PATH:/home/bertrand/.local/bin:/opt/esp/xtensa-lx106-elf/bin/

cd /opt/esp/ESP8266_RTOS_SDK/examples/get-started/hello_world
make menuconfig
sudo vim /usr/lib/udev/rules.d/85-brltty.rules
# comment pid/vid 1a86:7523
sudo udevadm control --reload-rules
sudo service brltty-udev stop
To flash target board
make flash
After the initial flash, you may just want to build and flash just your app, not the bootloader and init data bin:
make app # build just the app.
make app-flash # flash just the app.
Run/Debug
make monitor
minicom -D /dev/ttyUSB0 -8 -b 115200

-- idf_monitor on /dev/ttyUSB0 74880 ---
--- Quit: Ctrl+] | Menu: Ctrl+T | Help: Ctrl+T followed by Ctrl+H ---

 ets Jan  8 2013,rst cause:2, boot mode:(3,6)

load 0x40100000, len 2408, room 16
tail 8
chksum 0xe5
load 0x3ffe8000, len 776, room 0
tail 8
chksum 0x84
load 0x3ffe8310, len 632, room 0
tail 8
chksum 0xd8
csum 0xd8

2nd boot version : 1.6
  SPI Speed      : 40MHz
  SPI Mode       : QIO
  SPI Flash Size & Map: 32Mbit(512KB+512KB)
jump to run user1 @ 1000

rf cal sector: 1017
rf[112] : 00
rf[113] : 00
rf[114] : 01

SDK ver: 2.0.0(5a875ba) compiled @ Aug  9 2016 15:12:27
phy ver: 1055, pp ver: 10.2
make monitor
end with ctrl-]
ESP32 IDF
Host preparation
From Espressif "Get Start Guide" | html
sudo apt-get install git wget flex bison gperf python3 python3-pip python3-venv cmake ninja-build ccache libffi-dev libssl-dev dfu-util libusb-1.0-0
# sudo apt install python-is-python3
Toolchain & SDK
sudo mkdir /opt/esp32
sudo chown `id -un`:`id -gn` /opt/esp32
cd /opt/esp32

git clone -b v5.2 --recursive https://github.com/espressif/esp-idf.git

cd esp-idf
./install.sh esp32c3,esp32c6
Build example
export IDF_PATH=/opt/esp32/esp-idf
. /opt/esp32/esp-idf/export.sh

cd /opt/esp32/esp-idf/examples/get-started/hello_world
idf.py set-target esp32c3
idf.py menuconfig
# Set flash size ...etc

idf.py build
To flash target board
idf.py -p ttyUSB0 flash
Run/Debug
idf.py -p PORT monitor
minicom -D /dev/ttyUSB0 -8 -b 115200
Documentation
- Espressif ESP32 IDF API | html
- Espressif ESP8266 IDF API | html
- FreeRTOS API | html
- ESP32 IDF SDK Sources | html
- ESP8266 SDK Sources | html
- ESP32-C6 TRM | html
03-Mar-2024

